Oneup Uploader Blueimp Jquery Upload Success Response
Creating Multi-files Uploader with blueimp jQuery Plugin & PHP
Blueimp File Upload is a popular free jQuery File upload plugin which tin can handle multiple file uploads, information technology comes with many attractive features like drag & drop support, progress bars, client side preview of pictures, audios and videos. It works with any server-side platform such equally Google App Engine, PHP, Python, Ruby on Rails, Coffee. Today I am going to use this wonderful jQuery plugin to create a custom file uploader interface (without Bootstrap or jQuery UI layout). With picayune scrap of CSS and jQuery our final multiple file uploader should look equally picture below, we can and so elevate and drop files on it, preview image or play audio or video files before even uploading them to the server. 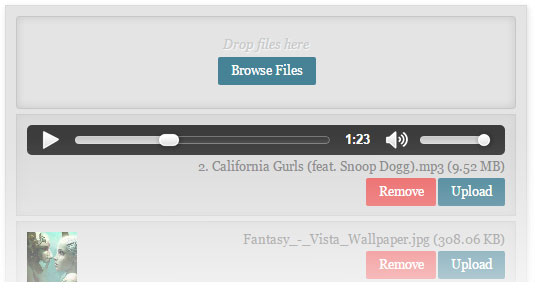
Browser Support
- 6+
- v31+
- v30+
- v4+
- v11+
Mark Up
In the HTML code, we have outer DIV chemical element which holds everything together, inside nosotros have drop zone, file input, button and files container elements. We will use CSS to mode these elements, since well-nigh of these elements volition be controlled by jQuery script, nosotros practise not demand to add annihilation else, unless you have other ideas on your mind.
HTML
- one
- 2
- three
- iv
- 5
- 6
- 7
- 8
- nine
- 10
- 11
- 12
- thirteen
<div class="upload-wrapper"> <div id="error_output"></div> <!-- file drop zone --> <div id="dropzone"> <i>Drop files hither</i> <!-- upload push button --> <span grade="push button btn-blueish input-file"> Scan Files <input id="fileupload" type="file" name="files[]" multiple> </span> </div> <!-- The container for the uploaded files --> <div id="files" class="files"></div> </div> Include jQuery Scripts
Once we have our HTML elements in position, we need to include jQuery library along with blueimp jQuery scripts. Plugin requires jQuery UI to function, but fortunately blueimp comes with smaller, lightweight version of original jQuery UI.
JS
- 1
- 2
- iii
- 4
- 5
- half dozen
- 7
- 8
- 9
- 10
- 11
- 12
- 13
- 14
- 15
- 16
- 17
- 18
- 19
- 20
- 21
- 22
<!-- include jQuery --> <script src="js/jquery.min.js"></script> <!-- The jQuery UI widget factory, can be omitted if jQuery UI is already included --> <script src="js/vendor/jquery.ui.widget.js"></script> <!-- The Load Prototype plugin is included for the preview images and image resizing functionality --> <script src="js/load-image.all.min.js"></script> <!-- The Canvas to Blob plugin is included for image resizing functionality --> <script src="js/canvas-to-hulk.min.js"></script> <!-- The Iframe Transport is required for browsers without support for XHR file uploads --> <script src="js/jquery.iframe-send.js"></script> <!-- The XDomainRequest Send is included for cantankerous-domain file deletion for IE 8 and IE 9 --> <!--[if (gte IE viii)&(lt IE 10)]> <script src="js/cors/jquery.xdr-send.js"></script> <![endif]--> <script src="js/jquery.fileupload.js"></script> <!-- The File Upload processing plugin --> <script src="js/jquery.fileupload-process.js"></script> <!-- The File Upload image preview & resize plugin --> <script src="js/jquery.fileupload-image.js"></script> <script src="js/jquery.fileupload-video.js"></script> <!-- optional for video uploads --> <script src="js/jquery.fileupload-audio.js"></script> <!-- optional for audio uploads --> <script src="js/jquery.fileupload-validate.js"></script> Initialization
Nosotros at present have included the required scripts for our file upload, it is time to initialize file upload plugin with various Options bachelor, which can exist inverse according to 1'southward needs.
JQUERY
- 1
- 2
- 3
- four
- 5
- 6
- 7
- 8
- 9
- 10
- 11
- 12
- 13
- 14
- xv
- 16
- 17
- xviii
- 19
var fi = $('#fileupload'); //file input //initialize blueimp fileupload plugin var process_url = 'http://path/to/file/upload.php'; //PHP script fi.fileupload({ url: process_url, dataType: 'json', autoUpload: false, acceptFileTypes: /(\.|\/)(gif|jpe?g|png|mp4|mp3)$/i, maxFileSize: 1048576, //1MB // Enable epitome resizing, except for Android and Opera, // which actually support image resizing, but fail to // send Hulk objects via XHR requests: disableImageResize: /Android(?!.*Chrome)|Opera/ .test(window.navigator.userAgent), previewMaxWidth: l, previewMaxHeight: 50, previewCrop: true, dropZone: $('#dropzone') //specify element for drop zone }); Every bit you tin can see it is accepting number of file formats, and maximum file size allowed is 1 MB, these options only work if we have included "jquery.fileupload-validate.js" script, and features like image preview requires "jquery.fileupload-prototype.js", so basically fifty-fifty if y'all don't include some of these dependency scripts, file upload will work perfectly, but some of "those" functionality will be absent.
Adding Files to Queue
To add files in the file container queue for upload, we use add callback method. Since autoUpload is set fake in initialization option above, files will not be uploaded automatically, nosotros will be creating upload buttons instead, which will trigger file upload.
JQUERY
- 1
- 2
- three
- 4
- five
- 6
- seven
- 8
- 9
- 10
- 11
- 12
- 13
- xiv
- fifteen
- 16
- 17
- 18
- 19
- 20
- 21
- 22
- 23
- 24
- 25
- 26
- 27
- 28
- 29
- xxx
- 31
- 32
var progressBar = $('<div/>').addClass('progress').suspend($('<div/>').addClass('progress-bar')); //create progress bar var uploadButton = $('<button/>').addClass('push btn-bluish upload').text('Upload'); //create upload button uploadButton.on('click', function () { //button click part var $this = $(this), data = $this.data(); data.submit().always(function () { //upload the file $this.remove(); //remove this button }); }); fi.on('fileuploadadd', function (east, information) { data.context = $('<div/>').addClass('file-wrapper').appendTo('#files'); //create new DIV with "file-wrapper" grade $.each(data.files, part (index, file){ //loop though each file var node = $('<div/>').addClass('file-row'); //create a new node with "file-row" class var removeBtn = $('<button/>').addClass('button btn-carmine remove').text('Remove'); //create new remove push removeBtn.on('click', function(e, data){ //remove button role $(this).parent().parent().remove(); //remove file's wrapper to remove queued file }); //create file info text, name and file size var file_txt = $('<div/>').addClass('file-row-text').append('<span>'+file.proper name + ' (' +format_size(file.size) + ')' + '</span>'); file_txt.suspend(removeBtn); //add together remove button inside info text chemical element file_txt.prependTo(node).append(uploadButton.clone(true).data(information)); //add to node element progressBar.clone().appendTo(file_txt); //add together progress bar if (!index){ node.prepend(file.preview); //add image preview } node.appendTo(data.context); //adhere node to information context }); }); Upload Progress
Think the progress bar we added and cloned in add method in a higher place, we can use it to display progress upload of each file using progress method as shown below. To rail progress of all (global) upload events, we tin use progressall method.
JQUERY
- 1
- 2
- 3
- iv
- 5
- vi
- 7
- 8
fi.on('fileuploadprogress', office (e, data) { var progress = parseInt(data.loaded / data.total * 100, 10); if (data.context) { data.context.each(function () { $(this).discover('.progress').attr('aria-valuenow', progress).children().first().css('width',progress + '%').text(progress + '%'); }); } }); Successful Upload
On successful ajax request, server returns JSON response, to capture these data, we utilize done callback, which is the equivalent to the success callback provided past jQuery ajax().
JQUERY
- 1
- 2
- iii
- iv
- 5
- 6
- 7
- 8
- nine
- 10
- 11
- 12
- 13
- 14
- 15
fi.on('fileuploaddone', function (e, information) { // invoke callback method on success $.each(data.issue.files, office (index, file) { //loop though each file if (file.url){ //successful upload returns a file url var link = $('<a>') .attr('target', '_blank') .prop('href', file.url); $(data.context.children()[alphabetize]).addClass('file-uploaded'); $(data.context.children()[alphabetize]).find('canvas').wrap(link); //create a link to uploaded file url $(information.context.children()[alphabetize]).find('.file-remove').hide(); //hide remove push var done = $('<span class="text-success"/>').text('Uploaded!'); //testify success message $(data.context.children()[alphabetize]).suspend(washed); //add everything to data context } else if (file.fault) { var error = $('<span form="text-danger"/>').text(file.fault); //fault text $(data.context.children()[index]).append(error); //add to information context } }); }); PHP Upload Handler
Blueimp File uploader comes with file upload handler for different server platform. If you are using different platform y'all tin find these handler at their Github Repo. For this tutorial nosotros volition be using PHP file upload handler (UploadHandler.php). All nosotros need to do is include the file in our upload PHP script and it takes care of everything. We just need to provide parameters as per our requirement.
PHP
- one
- two
- 3
- 4
- five
- half dozen
- vii
- 8
- 9
require('UploadHandler.php'); $upload_dir = '/home/path/to/uploads/folder/'; $upload_handler = new UploadHandler(array( 'max_file_size' => 1048576, //1MB file size 'image_file_types' => '/\.(gif|jpe?grand|png|mp4|mp3)$/i', 'upload_dir' => $upload_dir, 'upload_url' => 'http://localhost/multi_file_upload/uploads/', 'thumbnail' => assortment('max_width' => 80,'max_height' => lxxx) )); Conclusion
Creating custom uploader with Blueimp file upload plugin is actually effortless, considering you lot spend less time correcting errors and more time designing user interface, what else can one enquire for. You can find everything included in downloadble file below, blueimp plugin is likewise included in the package, merely don't forget to checkout demo and give your valuable feedback, expert luck!
New question is currently disabled!
Source: https://www.sanwebe.com/2015/06/ajax-multi-file-upload-with-blueimp-php
0 Response to "Oneup Uploader Blueimp Jquery Upload Success Response"
Post a Comment